Sunday, November 2, 2008

Striped Seed Stitch Scarf


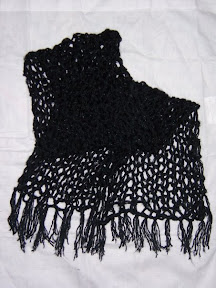
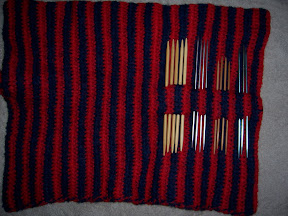
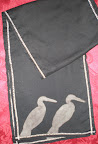
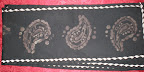
I went to a yard sale at a church nearby and found a Lion Brand learn to knit kit that had yarn in it. It was really cheap and came with needle and some yarn, so it seemed like a good buy. I decided to make this scarf using the two colors. I am really pleased with it because I like how the seed stitch pattern incorporates the two colors together in a way that is different from a normal garter or stockinette scarf would. After I blocked the colors looked even clearer and better.

Pattern:

Us #10 Straight needles
1 Lion Brand Jiffy Heather Blue (MC)
1 Lion Brand Jiffy White (CC)

CO 21 sts with MC

Work in seed st (K1, P1 across, end with K1, every row) for 1 inch, ending with a WS row
Work 2 rows with CC
Work 2 rows with MC

Work these four rows until scarf is desired length.

Cut CC
Work 1" with MC
BO

Weave in ends and block.

Sunday, August 10, 2008

Cast On Research

So I have only know about 4 cast ons but I have decided to research and learn as many as I can. I am going to post pics of how to do. On wiki I found 14: knit on cast on, cable cast on, single cast on, double cast on, tubular cast on, provisional cast on, double needle cast on, braided cast on, chain cast on, crochet chain cast on, provisional chain cast on Turkish cast on, magic cast on, and circular cast on. I know there's other ones, or at least different names for these. I am determined to become a self proclaimed cast on expert.

Tuesday, April 1, 2008

Biggest Ball of Yarn Ever


This is the ball of yarn that I am using to make a baby blanket for my friend. I wanted to use a large hook, so I decided to use two yarns together. It took me about two days to finish making the ball because I wanted to wind the two skeins together so I didn't have to work from two balls. Unfortunately I had bought two of those one pound skeins. At the end I had to lay the ball in lap as I wound the yarn on it because it felt so heavy.

Thursday, February 14, 2008

Basic Socks


I finally finished the second sock to this pair. I got the pattern from a sock generator website, and it didn't work out very well (see the sock on the left). I was so mad that I hid the sock. I recently found it and decided to make a mate for it, but this time using my own patten. So I counted the ribbing on the first sock, CO 64 sts on four dpns and just went from there. It actually turned out ok and it is hard to tell that they aren't from the same pattern.

Wednesday, February 13, 2008

Crocheted Pigtail Keychain


This pattern is for a curl that looks like a pig's tail. This will also be sold at a fundraiser for the club. I also used this to have everyone practice increases.

To make a curl the foundation chain is overloaded with single crochet (sc).

Chain at least 15. Turn.

Work two single crochet (sc) in each stitch.

Fasten off and weave in tails.

Attach keychain.

Granny Square Kaychain

Here is a pattern I made for our club at school. The keychains will be sold at a fundraiser. I'm also using it as an intro to granny squares.

Makes a basic three layered Granny Square.

You can use a different color for each round.

  • To start:
    • Make a slip knot.
    • Chain (ch) 5, join last chain to first chain with a slip stitch (sl st) to form a ring

  • Round (rnd) 1:
    • Ch 3
    • Work two double crochet (dc) in ring
    • (Ch 2, make 3 dc in ring) three times
    • Ch 2
    • Join work with a sl st in top of the ch-3 at beginning (beg) of rnd
    • Fasten off and weave in tail.
  • Rnd 2:
    • Join yarn in second ch-2 space (sp) before the join of the rnd you just finished
    • Ch 3
    • In same sp as ch-3 work 2 dc
    • Ch 2
    • 3 dc (first corner made)
    • (Ch 1, in next ch-2 sp work 3 dc, ch 2, work 3 dc) three times
    • Ch 1
    • Join with sl st to top of beg ch-3
    • Fasten off and weave in tail.
  • Rnd 3:
    • Join yarn in the second ch-2 sp before the join of the rnd you just finished
    • Ch 3
    • In same sp as ch-3 work 2 dc
    • Ch 2
    • 3 dc (first corner made)
    • (Ch 1, in next ch-1 sp make 3 dc, ch 1, in the next ch-2 sp make a corner [same as above]) three times
    • Ch 1
    • Work 3 dc in next ch-1 sp
    • Ch 1
    • Join with sl st to the top of the beg ch-3
    • Fasten off and weave in tail

  • Attach keychain.

Monday, February 11, 2008

Broadripple Socks

I made this socks from a pattern on Knitty.com. They were extremely simple and a good step up from a basic sock pattern. I highly recommend it for beginners who want to do something a little fancy. All that is used to make the ripple stitch is YOs, k2togs, and SSKs. The pattern also says to use Cascade yarn, which is an elastic yarn, but I just used a cheap baby yarn from the local yarn shop.

Sock Blockers

I made these sock blockers by following Little Sesame Knits' blog. Basically you cut out a foot shape out of plastic place mats. She gave a pattern to trace for it, but it was too small, and I didn't feel like enlarging it like she suggested, so I traced about a half inch around a sock and it turned out perfect. Also to make the blockers stiffer I super glued two cut outs together.

Wednesday, January 30, 2008

Lacy Scarf


I made this scarf out of three yarns held together, including a sparkley yarn and a mohair yarn. I used US size 50 needles to make it.

Granny Square Lapghan


This is an example of the granny square that wouldn't end. I wanted to learn how to make granny squares, and for a while I just kept going for practice. I just couldn't stop and eventually I ran out of yarn that matched. It is the perfect size for a baby blanket.

Felted Needle Caddy

This is a super simple project and it comes out looking great. I used 100% wool yarn and crocheted a straight, striped piece. I then made and attached braids for the ties. I then felted it by hand in the sink just scrubbing it against itself with some detergent (which lubricates the fibers). Then I let it sit out for three days until it was dry.

Crochet Hat

This a cute hat pattern I got from a crochet magazine (I don't remember which one). It took me about two crochet sessions to finish it. The decorative rounds were actually joined and then the work was turned, so you worked a round on the right side and a round on the wrong side.

Amigarumi Cuteness


I love these!!! Amigarumi come from Japan. They are small crocheted creatures that are quick to make, and the use up your scraps of yarn. I made these three in two days. The bear is Lion Yarn Brand wool, and the other two are Lion Yarn Brand wool ease which is washable. I got the patterns from Mr. Funky's Super Crochet Wonderful which has the cutest Amigarumi patterns.

Metallics

Here is a way to add tacky bling to your project. This uses special metallic foil. A paste is painted on the fabric where you want the foil to be. You then lay the foil over top of it and heat press it. Ironing also works but it has to be hot enough.

Transfer Paper

This is easy too. You print an image on a piece of transfer paper and then iron it onto the fabric. The iron has to be hot enough or it won't work right. A press machine works good too. There are also different types of transfer paper which look glossier or are thicker, etc.

These pictures are of Yuna, Rikku, and Paine from the video game Final Fantasy X-2.

Discharge Dyeing


This is the easiest project I have ever done. Basically you bleach the color out of the fabrics. For these two I used a bleach pen which I find works the best. You then iron the picture and wash the fabric. You can use any product with bleach in it, and there are a ton of cleaning products with it. There is also discharge paste that does the same thing.

Tuesday, January 29, 2008

Silk Screening

Silk screening is process where a picture is created with photo emulsion on a screen. This blocks up the holes in the screen and when paint is put on top of it it is forced through the holes. At a later time I might go into it more, but I would take a while and I just am too lazy to do it right not.


This is a picture of my test print. I then put tape over the edges to clean it up. The next two pictures are of sides of a canvas bag that I printed the picture on.

Stenciled Floorcloth


In the theater floorcloths are used when the floor can't be painted. For our class we had to make small ones with a multi layered stencil. The stencil was made by photocopying a picture and then cutting out each section (of color) on a piece of board. My stencil had six layers. The corner drawings were from a motif book and were done by had. Normal house paint and acrylic paint was used and then it was sealed.

Marbled Paper

Here are pictures of marbled paper that I did. I had some trouble getting the paper to lay on the vat flat, and once one side of paper begins to absorb moisture it curls, which made it hard. The white spots are where sir got trapped between the paper and the surface.


Marbled Picture


I somehow managed to make this picture. I used the smallest amounts of paint possible by dipping the tip of skewer in the paint and then dipping it in the vat, which worked very well.

Marbling Finished Item


Here is my piece finished into a pillow. Candy cane anyone?

Marbling UFO

Here is a marbled piece I did that started out terrible but became quite pretty. I started with light blue, light purple, light pink, and black. I then added one drop of red in a horrible lapse of judgment and then I realized that that was not a good color combination. So added a ton of red and just mixed it all up and then made little swirls in what was left. Mistakes can be reversed!

Marbling: Finished Item


This is a pillow that I made from my marbling piece.

Marbling


Marbling is so much fun. Basically you make a big vat of gooey stuff. Then you put drops of paint on the surface which float, and then spreads out because of the surface tension. You change to patterns by swirling it, and raking it with combs and stuff like that. You then lay your piece of fabric or paper or whatever flat on the surface. After a few seconds you carefully lift it back up and hopefully the paint stuck. For this piece I used two different colored paints and made circles. Then as I laid the piece down I moved it side to side.

Block Printing Picture


This is the piece (silk) with the background made by the crocheted stamp and the bird is the carved block.

Block Printing With Dyes


This project was kind of like stamping. I carved this block to make my main stamp. Then to make a background I crocheted a swatch and glued it to a piece of wood. I then used a dye thickened with alginate (I think that's what it's called) which made it gooey so it could be stamped. I used the dye for the background. I used fabric paint to stamp the bird which was then heat set.

Silk Painting: Finished Scarf

This is my finished scarf with the design on both ends. For the background color I used black, but it came out purple. Also when the dye was washed out it darkened the whole picture.

Silk Painting: Pattern


For the patten on the silk painting I used this print out of a stained glass pattern.

Silk Painting: Pictures


To create a picture with silk painting a resist is used. The silk is stretched out on a frame. The pattern is then draw on the silk in pencil. Using the resist, called gutta, the picture is traced again. The picture needs to be in closed off sections because the gutta is keeping the dye from spreading. Then paint the sections. Once the piece is finished it needs to be dry cleaned to remove the gutta.

Silk Painting: Free Form 2


This is my second free form silk painting. I painted the circles first and then the yellow background. I also painted it dry so I got clearer lines. I like this much better than my first try.

Silk Painting: Free Form


In silk painting we used a different type of dye made especially for silk painting called Jaquard Silk Dye. The silk is stretched in a frame. Then you paint on the dye. You can either wet it, which allows the dye to spread more, or dry which is a little crisper. For this I tried to make flowers first but they came out terrible, so I painted the stripes over top of it. I really actually hate this piece, but it was my first silk piece.

Shibori


Shibori is a technique that was used in Kapan to dye silk. Various types of resists are used. The fabric can be twisted, folded, clamped, wrapped around poles, and tied. To do this piece I traced the design on the fabric (it is the Triforce from the Legend of Zelda games) and I used thread and stitched around it. I then pulled on the ends of the thread tight so the fabric was scrintched (I just made that word up) and is tight enough that the dye won't get in. I then tied string on little chunks of fabric to create the circles. You then dye it and untie it. I used forest green to match the colors of the video games.

Tye Dye


This was an awesome project to do. We mixed dye and put it in squeeze bottles. We then folded our fabrics and bound them with rubber bands. We put them in plastic bags and squeeze the dye onto it and into the folds. I left it there for about 24 hours. Then I unwrapped it and rinsed it. The colors I used here were sunrise red, turquoise, and plum.

Low Water Immersion: One Layer One Color

This version of low water immersion uses one color and one piece of fabric. The dry piece is put in a cup (I just stuffed this shirt in a plastic drinking cup) and pour the dye over. The color I started with was bright green, and the blueish color separated out from it.

Low Water Immersion: Bound Unbound


So in this version of low water immersion there is one piece of fabric and two colors are used. The fabric bound and dry and then dyed one color in a cup. It is then rinsed and unbound. Then bind it a different way, put it back in the cup and pour the second color over it. For this I used first electric blue and then fuschia red.

Low Water Immersion: Color Parfait

In low water immersion you are doing everything wrong. In the color parfait the first piece (my red one) is put in the bottom of a cup dry. Your fabric should usually be wet to let the dye flow through it more easily. You pour a small amount of concentrated dye on top of the piece and let it sit. I folded this piece in a spiral. Then you put a second piece on top of that one (my middle piece) and pour a different color dye on top. I folded this piece like a fan and then in half. Then you do this a third time. When done this way the dye travels up and down just a little bit because of the folds and the lack of water, so each piece has one main color and a little bit of two others. With this method you can match even the three ugliest, clashiest colors and they will then look good together. For these I used fire red (top), clear yellow (middle), and chartreuse (bottom).

Ombre


Ombre is a process that causes the fabric to go from light to dark. The dye is put in a container that is big enough for your fabric to sit covered in the solution. The fabric slowly and evenly lowered into the dye over about 20 minutes. In my picture is hard to see the difference between the top and the bottom, but the bottom is darker than the top.

Vat Dye


This is the second part of our first project in class. We used RIT dye and dyed one big piece of 100% cotton fabric one color. I had put this in the water for 2 minutes and 40 seconds. I didn't dye as dark as I wanted it to, and I did a test swatch, so I don't know what happened.

Color Wheel Scarf


With the pieces from my color wheel I made this scarf. I ripped up the pieces into strips and then put them in a bag and closed my eyes and picked them back out and that was the order of the strips in the scarf. I sewed them altogether with a sewing machine. I hadn't used a sewing machine in about 10 years so I had to learn how to do it again. I learned that me and bobbins don't mix. Then I sewed a black piece of cloth to the back of it, inside out with one side open like a pillow and then turn it right side out. I closed it and used my mom's sewing machine to make the border. The cloth is 100% cotton.

Color Wheel


This was part of the first project in our class. We had to use Procion dyes to dye fat quarters to each color of the color wheel by mixing three different color dyes in certain proportions to get all the colors. The dye is used in warm water. and after about 40 minutes a solution of soda ash and water is added to make the dye brighter and more permanent. This is the type of dye we used throughout the semester.

Batik Shirt


Here is a shirt I made using batik. The picture is an instruction on how to do the knit stitch. At the bottom it says "I'd rather be knitting". The picture didn't come out as clear as I wanted it to, but I think it would be near impossible for a beginner like me to get it any better.

Batik Pictures


What is batik? It is when wax is malted and put on a fabric and left to dry. The was acts as a resist and the fabric that is covered by the wax can't be dyed. So you put the wax on and dye it, then put more wax on colored parts, and dye again, and keep doing this so you get a multicolored dyed picture. You can also crinkle the wax so you get little veins of colors through your design. The giraffe piece was made with one large stamp, little star stamps, and paintbrushes for the grass. I dyed it four colors, first yellow, then green, then brown, then I tried dark blue for the sky. The blue did not come out because the fabric was dyed as far as it could be. The way that I understand it is that the fabric has receptors that the dye attaches to and once those receptors are filled up it can't be dyed anymore. So you will notice that there are two different browns, one is the dyed brown and one is from the brown being dyed with the dark blue. I also crinkle these pictures. The sunflower was painted with a paintbrush and the colors I used were golden yellow, then deep yellow, then deep orange, then forest green. Once again the last color did not come out but there is a little difference between it and the deep orange. When you are done dyeing you get as much wax out as possible by putting paper under and over the fabric and ironing it. The wax will melt and soak into the paper. Once you got as much wax as you could out you can take it to a dry cleaners and they will finish it for you. In this picture I had ironed the wax but had not gotten it cleaned so that it why there is a dark border around the pictures.